How to Remove Duplicates from Your Calendars

Duplicate entries may appear in your calendars for various reasons – whether it be software glitches, misconfiguration issues or human factor. Below please find a general instruction on how to remove such duplicates.

Just in case, before removing duplicates, you can make a backup of your Google calendar(s) as described here and make a copy of your Notes database and save it somewhere on your computer under some other name, as a backup.

1. If you’re using one-way synchronization from Notes to Google, and have no duplicates in Notes, you can recreate your Google calendar and resync your events from Notes to Google as described here  

2. If you’re using 2-way sync, first, you need to remove duplicated events from Notes. You can do this using the special database  – download it here 
Save it on your computer, then run it  (it will be added to your Workspace in Notes client). Then, in Action menu run  the option Clean Doubles Events. The tool will clean duplicated items from your  database calendar. Note that you can use this database as many times as needed to clean duplicated events in your Notes calendar.
 
After you cleaned duplicates from your Lotus Notes calendar, you can recreate your Google calendar to start a fresh sync, as described here

3. Then, if you have some duplicated events on your phone as well, after your Notes and Google calendar do not have any duplicated events, you can clear the calendar on your phone and resync events to it from Google.

When an E-Mail is Sent to my Lotus Notes Account, Will I Receive it on my Google account?

Today we were asked a question concerning this piece of Awesync.Mail functionality. Since the answer may be of help for other users, we publish it here. When an e-mail is received and appeared in your Lotus Notes client, it won’t appear in Gmail right away – it will be sync’ed according to a schedule set in Awesync.Mail settings. I.e. Awesync.Mail will sync your Lotus Notes mail automatically in time periods selected by you.  As you can see on the screen below, if you set synchronization interval to, say,  30 minutes, synchronization will be performed automatically each 30 minutes.  However, you can also perform a manual sync, when needed. 

How to Start a Fresh Sync to a Googe calendar

There can be many reasons for starting Lotus Google Calendar sync from scratch – you just may decide to create a separate calendar for your work events or recreate calendar with corrupted data, or remove duplicates which appeared after you played with AweSync settings, etc.

The procedure itself is quite easy, but to make sure you don’t loose any data and get it certainly pushed to your Google calendar, please keep in mind several things. First, please check if you have all needed events in your Notes calendar. Second, make sure the synchronization goes in the right direction – one-way, from Notes to Google. And, finally, don’t forget to remove AweSync index – otherwise, all existing events won’t be sync’ed to Google and sync will affect only the new ones. AweSync index stores information about all processed events, that’s why, if you don’t delete the index, your older events will be treated by AweSync as already sync’ed and the program will do nothing with them. Note, though, that you got to remove AweSync index at the right moment, because otherwise you may get duplicate events in your calendar.

To sum up, below is the whole procedure step-by-step:

  1. Disable automatic sync in AweSync if it’s enabled and make sure the sync is set from Lotus to Google one-way (again, this can be done if you have all needed events in Lotus Notes).
  2. Open your Google calendar settings in Web browser and click Delete next to the name of the calendar with which you were synchronizing. If it’s a primary one, the events in it will be removed, if it’s a secondary one, the calendar will be completely erased. If it is a secondary calendar, you’ll need to create a new one after deletion.
  3. Delete AweSync index from the tray icon menu: Debug->Remove Calendar Index, but do not sync yet!
  4. Open AweSync settings and click Retrieve to get your Google calendars list and make sure the right calendar is selected for synchronization and as the default one.
  5. Save the settings and run full sync – SyncALL -> Events from the tray icon menu.

Please ensure you follow the sequence of actions carefully to maintain data consistency and safety. You might vary this plan a bit depending on your particular situation, but always think twice to ensure it’s planned accurately as it’s all about safety of your valuable data! You can always contact our support team if you need help with resolving your particular situation.

Does AweSync Support Google 2-Step Verification?

Yes, you can set 2-Step verification and run Awesync in the same way as you did before setting it. You just need to take several easy steps to enable Awesync to work with 2-Step verification.

After your mobile phone was tied to your Google account, you should create a special password for Awesync in Google 2-Step verification settings page. Then copy the password, open Awesync Settings/General/Google account tab and paste the password into the Password field. Press Check credentials button to make sure the password is copied correctly. Now Awesync should work with 2-Step verification without any problems.

Starting from AweSync 4.25.0 release the following new setting appeared to support Google 2-Step verification for Tasks synchronization. Open AweSync Settings/Tasks/Google tab and enter your original Google password. Press Retrieve Tasks Groups button and enter Google verification code which should be sent to you via SMS.

Should I buy a new license if my Lotus username changes?

No, you should not buy a new license. We’re receiving some inquiries on whether one should buy another license if a username is changed, for example if there is some IT re-organization, or if person simply finds another job. This subject is even touched in some independent reviews (like this one), which we see on the Internet.

Dear customers, you have the right to transfer your license for free, if your username is changed for some reasons. Just email us at [email protected] with your inquiry, and we’ll inactivate your product license key, allowing you to activate it again with the new username. For sure, a change should be reasonable, i.e. we should see that this is a transfer of your activation to a different username, and not a transfer of license to another person.

Quick Tip: How to avoid “spam” to invitees

Sometimes we get complains from our users that “spam” has been sent to their invitees, while doing some manipulations with events synchronized by AweSync. The main “firewall” for preventing emailing is simply blocking invitees field from being synchronized.

However, if you’re synchronizing invitees for some reason, you should keep in mind certain scenarios when mailing to invitees may occur, and how to avoid it.

Remember, that whenever you got invitees from Lotus Notes synchronized to Google, everything is under your control. If you do any manipulations with this event in Google – either deleting the whole event, or removing an invitee, or rescheduling event (via editing event or by drag and drop), you’ll always be prompted whether you want to notify invitees about the changes in the event, or not. So, please read the prompt buttons from Google carefully to make sure you’re clicking the correct button.

Read more

How to send your data to development team

If some specific events were not sync’ed to Google, and you are ready to prepare and send us your data, please do the following:

1. Save this file dxlexport.exe to your Lotus Notes folder (for example, it may be something like C:\Program Files\IBM\Lotus\, but you need to select your own folder). This is compiled file dxlexport.exe from Lotus Notes C API package, it doesn’t contain any malware or viruses.

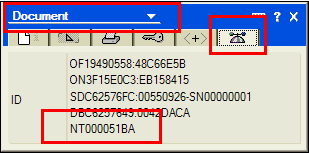
2. Open the document in Lotus Notes and press Alt-Enter keys. On a small window that appears make sure that the top select shows “Document”, then select the last tab and find the bottom line. It should contain NTxxxxxxx – in my example NT000051BA.

Document Properties

3. Open command line (for example, by using Win-R keys, then enter “cmd” there and press Enter, or by using Windows menu Start – Accessories – Command Line)

4. In command line, change the current directory to your Lotus Notes folder using command (don’t forget to enclose path in ” ” if you have spaces in LN path)

cd “C:\Program Files\IBM\Lotus Notes”

5. Run export with the following command:

If your mail database is on local workstation

dxlexport -o %TEMP%\out.xml mail\mymailfile.nsf NT000051BA

If your mail database is on Domino server

dxlexport -s Server/Company -o %TEMP%\out.xml mail\mymailfile.nsf NT000051BA

where

Server/Company is full name of your Domino server

%TEMP%\out.xml is the name of output file with data,

mail\mymailfile.nsf is real path to your mail file (don’t forget “” if needed)

NT000051BA is number from step 2

Then you can use Internet Explorer to preview the data (it renders XML quite good), and use any text editor, like Notepad, to remove anything you need to exclude.

Thank you for your help

How to report problems to AweSync support

If you faced any problem, please send us email with details as described below.
First of all, Awesync creates log, where all actions and bugs are saved. Log files are regular text files which are placed in folder “%APPDATA%\Awesync\Log”. To browse this folder you can just paste this string to Explorer’s path textbox. Usually this path is

  • In Windows XP: “C:\Documents and Settings\YOUR_USERNAME\Application Data\Awesync”
  • in Windows Vista, Windows 7 and above: “C:\Users\YOUR_USERNAME\AppData\Roaming\Awesync”

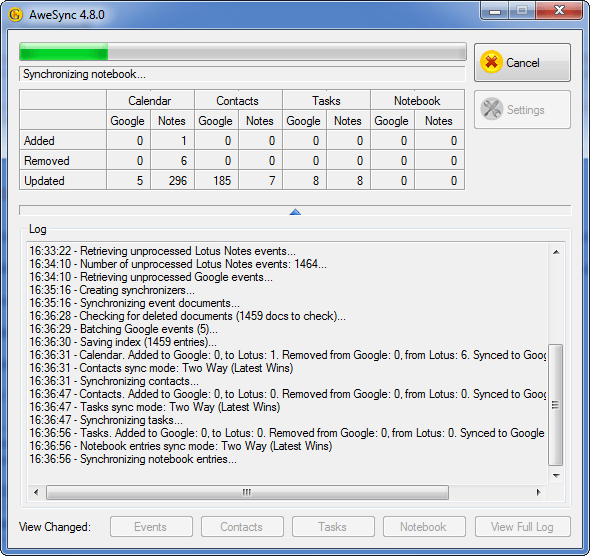
Only part of log is displayed in main window. For detailed log you can click “View Full Log” button in right bottom corner of expanded main window.

View Full Log


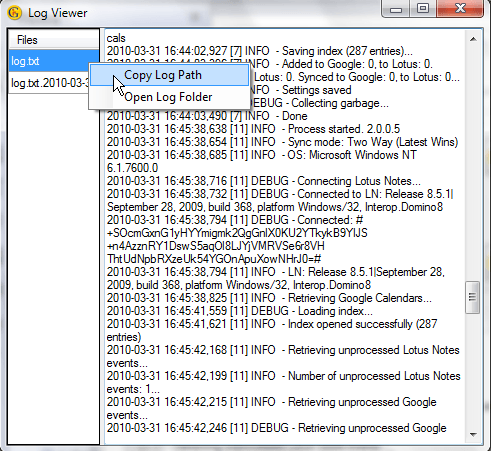
In “Log Viewer” you can see all existing logs, copy log text, and also copy full file name and open containing folder (in context menu on file name).

Log Viewer


Then attach this file to email and send it to support team – [email protected].